各言語で組み込みWebサーバーを利用する

前回、IntelliJの組み込みWebサーバーをご紹介しましたが、今回は、各プログラミング言語に含まれているWebサーバーをご紹介したいと思います。

IntelliJの場合は、プロジェクト名のサブフォルダがパスに含まれてしまうため、画像等を「/img/xxxxx.png」のようにドキュメントルートからのパスで指定している場合は、こちらの方法の方が良いかもしれません。

各言語とも、コンソール上でコマンドを実行することでサーバーを立ち上げることができます。

PHP

$ php -S <Host>:<Port>

「<Host>:<Port>」には例えば「localhost:80」を指定します。 コマンドの実行場所がドキュメントルートになります。

Python3

$ python -m http.server [<Port>]

<Port>を省略すると80が選択されます。 コマンドの実行場所がドキュメントルートになります。

Ruby

$ ruby -run -e httpd <DocumentRoot> -p <Port>

コマンドの実行場所をドキュメントルートにするには、<DocumentRoot>に「.」を指定します。

Node.js

Nodeには標準でWebサーバーは含まれていませんが、モジュールとして簡単に組み込むことができます。今回は、一番有名なhttp-serverをご紹介します。

まずはnpmでhttp-serverをインストール。

$ npm i -g http-server

http-serverを実行。

$ http-server [-p <Port>]

<Port>を省略すると80が選択されます。 コマンドの実行場所がドキュメントルートになります。

IntelliJで組み込みWebサーバーを利用する

弊社では、ソフトウェア開発のIDEとしてIntelliJ IDEAを利用しています。

現在、静的なサイトの開発中を行っており、その動作確認にWebサーバーが必要になったのですが、IntelliJには組み込みのWebサーバーが備わっており、IntelliJ起動時に自動的に立ち上がるみたいですね。

標準のポートは63342で、次のURLでアクセスすることができます。

http://localhost:63342/<ProjectName>

ポートを変更したい場合は、

Settings -> Build, Execution, Deployment -> Debugger

のBuilt-in serverで設定することができます。

Rails(Turbolinks)でGoogle AdSenseを利用

TurbolinksはPjax(pushState + Ajax)を実現するためのライブラリで、Rails 5では標準で有効になっています。Turbolinksを使うと、ページ遷移時に画面全体の読み込みが行われないため、非常にスムーズな操作性を実現することができます。

しかし、Turbolinksが適用されたサイトにGoogle AdSense(Googleが提供する広告配信サービス)を導入すると、ページ遷移後に広告が正しく表示されない問題が発生する場合があります。

これを防ぐには、Turbolinksによる画面の読み込みをトリガとして、新たに表示された広告ユニットを認識させる処理を加える必要があります。

例えば、自動サイズの広告ユニットを表示させる場合、Turbolinksを適用させていない通常のサイトでは、<head>タグ内に

<script async src="//pagead2.googlesyndication.com/pagead/js/adsbygoogle.js"></script>

を追加した上で、HTMLの広告を表示させたい場所に次のようなコードを挿入します。一つのページに複数の広告ユニットを表示することも可能です。

<ins class="adsbygoogle"
     style="display:block"
     data-ad-client="ca-pub-xxxxxxxxxxxxxxxx"
     data-ad-slot="xxxxxxxxxx"
     data-ad-format="auto"
     data-full-width-responsive="true"></ins>
<script>
(adsbygoogle = window.adsbygoogle || []).push({});
</script>

一方、Turbolinksが適用されたサイトでは、<head>内でのadsbygoogle.jsの読み込みは同じですが、広告を表示させたい場所には<ins>タグのみを挿入し、

<ins class="adsbygoogle"
     style="display:block"
     data-ad-client="ca-pub-xxxxxxxxxxxxxxxx"
     data-ad-slot="xxxxxxxxxx"
     data-ad-format="auto"
     data-full-width-responsive="true"></ins>

その上で次のコードを<head>タグ内に挿入します。(外部Javascriptファイルに切り出して、読み込ませてもOKです。)turbolinks:loadに対するイベントリスナを設定することで、初回表示時やTurbolinksによる画面遷移時に処理が走ります。

<script>
  document.addEventListener('turbolinks:load', function () {
    var ads = document.querySelectorAll('.adsbygoogle');
    if (ads.length > 0) {
      ads.forEach(function (ad) {
        if (ad.firstChild) {
          ad.removeChild(ad.firstChild);
        }
        window.adsbygoogle = window.adsbygoogle || [];
        window.adsbygoogle.push({});
      });
    }
  });
</script>

ここでは、 adsに格納された<ins>要素を一つ一つ走査し、ブラウザバック等で既に広告の実体が挿入されている<ins>に関しては初期化を行った上で、 window.adsbygoogleに対して空のハッシュを挿入することで、adsbygoogle.jsに対して広告ユニットの存在を知らせています。

以上で、Turbolinksが利用されたサイトでもGoogle AdSenseによる広告が正しく表示されるようになります。
Windows10でスクリーンショットを撮影する

Windows10にいつの間にか範囲を指定してスクリーンショットを撮る機能が追加されていました。

使い方は簡単。「Shift + Win + S」をクリックすると、画面が白く曇りカーソルが十字型になります。その状態で、撮影したい領域をマウスで選択するとスクリーン画像がクリップボードにコピーされます。PNG等の形式で保存したい場合は、ペイント等に貼り付けて保存します。

従来のやり方も含めて、三種類の方法でスクリーンショットを撮れるようになりました。

画面全体を撮影Print Screen
アクティブなウィンドウを撮影Alt + Print Screen
(New) 選択した範囲を撮影Shift + Win + S

ちなみに、撮影した画像に文字やマーカーを入れる場合は、Windowsに標準で含まれる、Snipping Toolというアプリケーションを使うのが便利です。タスクバー左下の検索窓に「sn」を入力すると出てきます。

また、有償ですが、Snagitというツールは様々な領域の自動選択や撮影履歴の自動保存、動画撮影等、より高度な機能を持っているため、私は普段こちらを利用しています。
https://www.techsmith.com/screen-capture.html

MySQLで文字列カラムの一部を置換

運用しているWordPressのサイトのドメインを変更した際に、一部の画像が表示されなくなる問題が発生しました。

それらの画像はImage Pasteというプラグインを利用してクリップボードから投稿に張り付けたものでしたが、どうもドメインを含む絶対パスで画像を指定するため、ドメイン変更後も古いURLのままになっていたことが原因でした。

一つ一つ修正するのは手間がかかるため、データベース上で直接修正できないかと調べたところ、MySQLのREPLACE関数を使うことで、投稿の文字列の一部だけをまとめて変更できることが分かりました。

UPDATE wp_posts SET post_content = REPLACE(post_content, 'old.domain', 'new.domain') WHERE post_content LIKE '%old.domain%'


EclipseでHTMLファイルの文字コードがShift_JISになるのを防ぐ

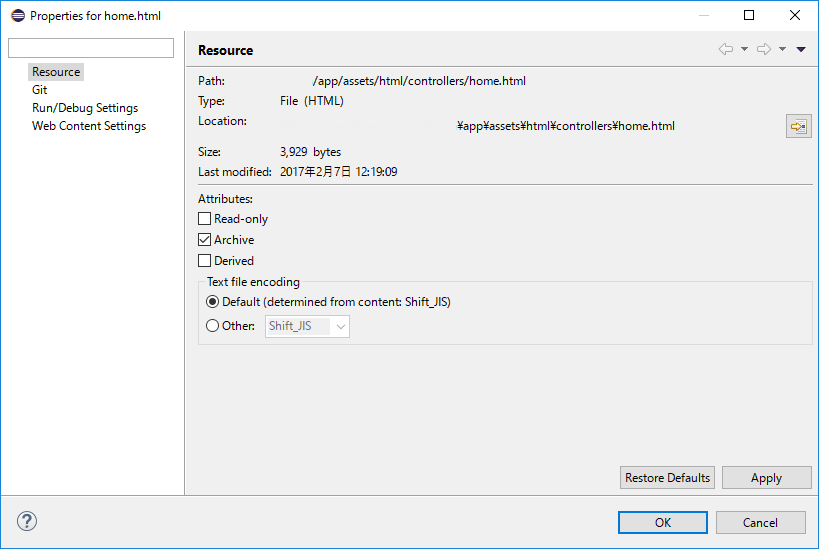
EclipseでHTMLファイルを開くと、内容がUTF-8にも関わらず以下のように勝手にShift_JISと判定される場合があります。

これは、org.eclipse.wst.html.core.internal.contenttype.EncodingGuesserの挙動によるもので、文字コードの判定ができない場合、日本語環境においては自動的にShift_JISが設定されるようです。ワークスペースの文字コードを変更しても、Content TypesのHTMLのDefault encodingを設定しても効果はありません。

対策としては、HTMLファイルの<head>内に<meta charset=”UTF-8″>タグを含める方法があります。charsetに指定してある文字コードが自動的に設定されます。しかし、フレームワーク等でHTMLファイルを分割して利用している場合は、この方法をとることはできません。他にも、.htmlの拡張子を持つファイルをHTML以外のコンテントタイプに紐づけたり、EnxodingGuesser自体を書き換えてしまうアプローチを取っている方もいるようですが、少し手間がかかりそうです。

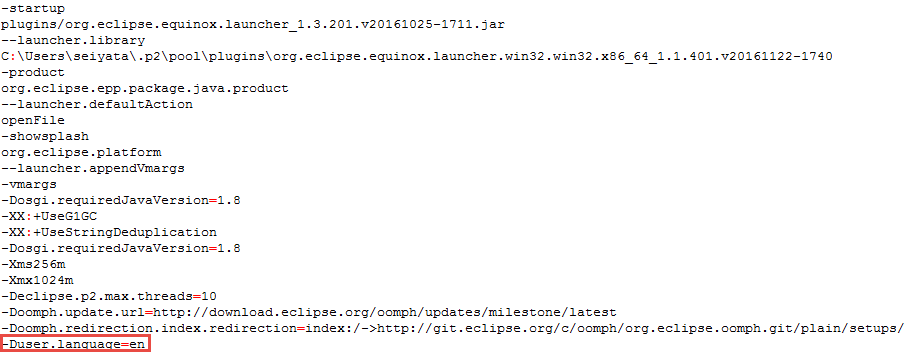
一番簡単なのは、Eclipseを英語環境で起動する方法です。eclipse.exeと同じ場所にあるeclipse.iniにEclipseを起動するJVMの環境変数として、「-Duser.language=en」を加えます。

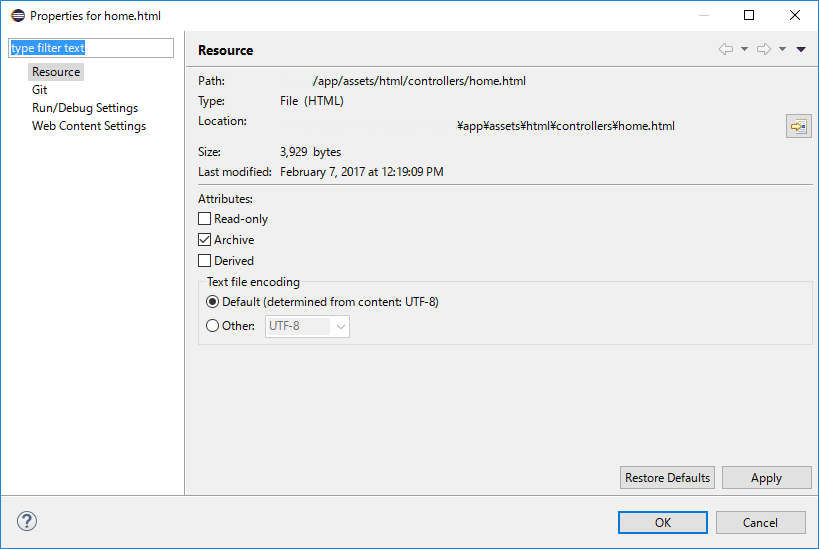
Eclipseを再起動すると、以下のようにUTF-8と設定されていることが分かります。日付の表記も英語に変わってしまいましたが、大きな問題ではないでしょう。

[参考]

https://bugs.eclipse.org/bugs/show_bug.cgi?id=237567

Windows10でスリープから勝手に復帰しないようにする(2)

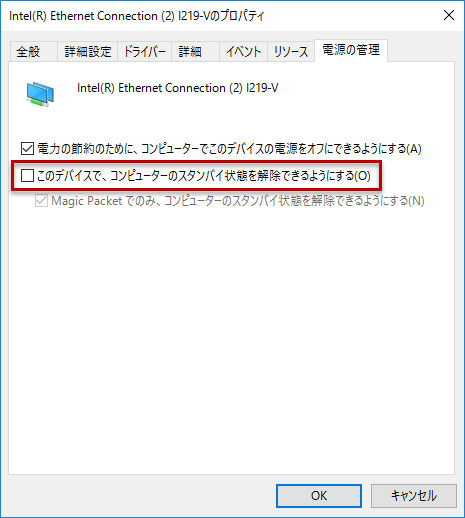
Windows10でスリープから勝手に復帰しないようにするでは、電源オプションから「スリープ解除タイマーの許可」を無効にするように設定しました。しかし、これでは不十分なようで、ネットワークアダプターによる通信によってスリープが勝手に解除されてしまうケースがありました。

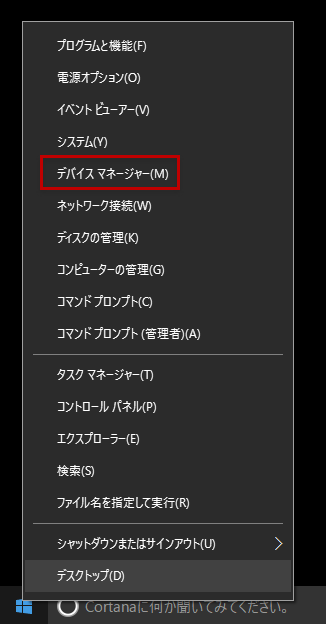
これを防ぐには、まずスタートボタンを右クリックして表示されるコンテキストメニューからデバイスマネージャーを起動します。

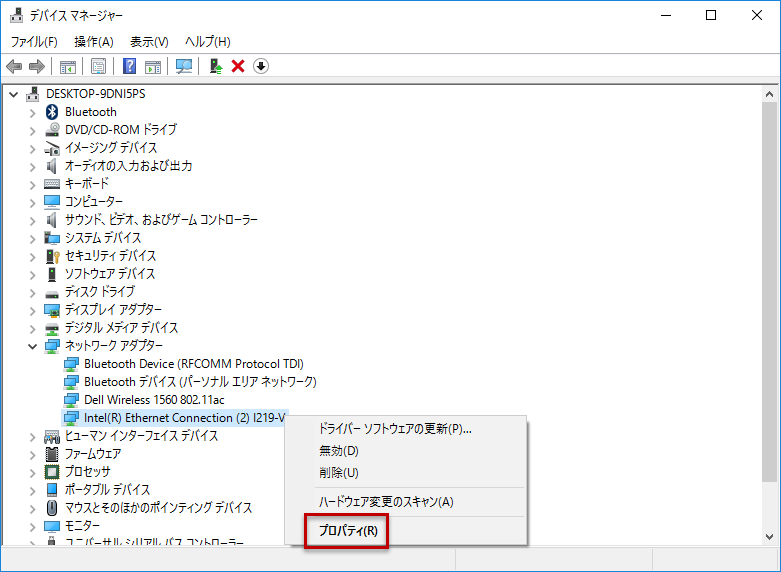
ネットワークアダプターの中の該当のデバイスを右クリックし、プロパティを選択します。

「このデバイスで、コンピューターのスタンバイ状態を解除できるようにする」のチェックを外し「OK」ボタンをクリックします。

ちなみに、マウスによるスタンバイの解除を停止するには、マウスのプロパティから同様の操作をします。

既にコミットしたファイルを.gitignoreに追加

既にコミットしたファイルを.gitignoreに追加しても、自動的に除外してくれません。除外するには、以下のステップを実施します。

まず、.gitignoreに除外したいファイル(/path/to/file)を追加します。

$ vim .gitignore

.project
.settings/
/path/to/file

次に、gitのキャッシュをクリアします。

$ git rm --cached /path/to/file

最後に変更をコミットします。

$ git add .gitignore
$ git commit -m "Add /path/to/file to .gitignore"

WindowsにPythonをインストール

プログラミング言語であるPythonをWindowsにインストールした際のメモです。

インストーラのダウンロード

PythonにはWindows用のインストーラが用意されています。PythonのWebサイトからダウンロードします。

必要なバージョンのダウンロードボタンをクリックします。ここではv3.5.1をダウンロードしました。

Pythonはバージョン2系と3系に互換性がないため、2系が未だに主流であると言われています。違いを理解するために、以下のサイトを参考にさせていただきました。

http://postd.cc/the-key-differences-between-python-2-7-x-and-python-3-x-with-examples/

インストールの実行

ダウンロードしたインストーラーを実行すると、インストールのためのウィザードが開始します。pythonコマンドに対してパスを通すために、「Add Python 3.5 to PATH」にチェックを入れ、「Install Now」をクリックします。

以下の画面が表示されればインストールは完了です。

念のため、コマンドラインでバージョンを確認します。

>python --version
Python 3.5.1

WindowsでFlaskアプリケーション開発

PythonのWebフレームワークであるFlaskを利用したアプリケーションを、Windows上で開発するための環境のセットアップのメモです。Flaskはマイクロフレームワークに分類され、フルスタックであるDjangoと比較して、動作が軽く必要な機能はプラグイン形式で導入する形になります。

Pythonのインストールに関しては、こちらをご参照ください。

easy_installのインストール

easy_installはPythonのパッケージ管理ツールの一つで、後述するVirtualenvのインストールに必要です。easy_installをインストールするためのPythonスクリプトが容易されているので、まずそちらをダウンロードします。Chromeであれば、リンクを右クリックして、コンテキストメニューから「名前を付けてリンク先を保存」をクリックします。

http://peak.telecommunity.com/dist/ez_setup.py

次に、ダウンロードしたファイルを保存したフォルダをエクスプローラーで開き、Shiftキーを押しながら右クリックで表示されるコンテキストメニューから「コマンドウィンドウをここで開く」をクリックします。

コマンドプロンプトが開いたら、ダウンロードしたスクリプトを引数としてpythonコマンドを実行します。

D:\tmp>python ez_setup.py

以上でeasy_installのインストールは完了です。

Virtualenvのインストール

Virtualenvは、プロジェクト毎に個別の環境を構築するためのツールです。easy_installがインストールされていれば、Virtualenvのインストールは簡単です。コマンドライン上で以下を実行します。

D:\tmp>easy_install virtualenv
Searching for virtualenv
Reading https://pypi.python.org/simple/virtualenv/
Best match: virtualenv 15.0.1
Downloading https://pypi.python.org/packages/c8/82/7c1eb879dea5725fae239070b48187de74a8eb06b63d9087cd0a60436353/virtualenv-15.0.1.tar.gz#md5=28d76a0d9cbd5dc42046dd14e76a6ecc
Processing virtualenv-15.0.1.tar.gz
Writing C:\Users\seiyata\AppData\Local\Temp\easy_install-dch8lu7p\virtualenv-15.0.1\setup.cfg
Running virtualenv-15.0.1\setup.py -q bdist_egg --dist-dir C:\Users\seiyata\AppData\Local\Temp\easy_install-dch8lu7p\virtualenv-15.0.1\egg-dist-tmp-m10a2jwn
warning: no previously-included files matching '*' found under directory 'docs\_templates'
warning: no previously-included files matching '*' found under directory 'docs\_build'
creating c:\users\seiyata\appdata\local\programs\python\python35-32\lib\site-packages\virtualenv-15.0.1-py3.5.egg
Extracting virtualenv-15.0.1-py3.5.egg to c:\users\seiyata\appdata\local\programs\python\python35-32\lib\site-packages
Adding virtualenv 15.0.1 to easy-install.pth file
Installing virtualenv-script.py script to c:\users\seiyata\appdata\local\programs\python\python35-32\Scripts
Installing virtualenv.exe script to c:\users\seiyata\appdata\local\programs\python\python35-32\Scripts
Installing virtualenv.exe.manifest script to c:\users\seiyata\appdata\local\programs\python\python35-32\Scripts

Installed c:\users\seiyata\appdata\local\programs\python\python35-32\lib\site-packages\virtualenv-15.0.1-py3.5.egg
Processing dependencies for virtualenv
Finished processing dependencies for virtualenv

Flaskプロジェクトの作成

まず、プロジェクトフォルダを作成します。

D:\workspace>mkdir test_app

次に、プロジェクトフォルダ内に移動して、Virtualenvを利用して仮想環境を作成します。

D:\workspace>cd test_app

D:\workspace\test_app>virtualenv env
Using base prefix 'c:\\users\\seiyata\\appdata\\local\\programs\\python\\python35-32'
New python executable in D:\workspace\test_app\env\Scripts\python.exe
Installing setuptools, pip, wheel...done.

次に、仮想環境をアクティベートします。

D:\workspace\test_app>env\scripts\activate

(env) D:\workspace\test_app>

最後に、Flaskを仮想環境内にインストールします。

(env) D:\workspace\test_app>easy_install Flask
Searching for Flask
Reading https://pypi.python.org/simple/Flask/
Best match: Flask 0.10.1
Downloading https://pypi.python.org/packages/db/9c/149ba60c47d107f85fe52564133348458f093dd5e6b57a5b60ab9ac517bb/Flask-0.10.1.tar.gz#md5=378670fe456957eb3c27ddaef60b2b24
Processing Flask-0.10.1.tar.gz
Writing C:\Users\seiyata\AppData\Local\Temp\easy_install-d58jvkrd\Flask-0.10.1\setup.cfg
Running Flask-0.10.1\setup.py -q bdist_egg --dist-dir C:\Users\seiyata\AppData\Local\Temp\easy_install-d58jvkrd\Flask-0.10.1\egg-dist-tmp-zoqxaa36
warning: no files found matching '*' under directory 'tests'
warning: no previously-included files matching '*.pyc' found under directory 'docs'
warning: no previously-included files matching '*.pyo' found under directory 'docs'
warning: no previously-included files matching '*.pyc' found under directory 'tests'
warning: no previously-included files matching '*.pyo' found under directory 'tests'
warning: no previously-included files matching '*.pyc' found under directory 'examples'
warning: no previously-included files matching '*.pyo' found under directory 'examples'
no previously-included directories found matching 'docs\_build'
no previously-included directories found matching 'docs\_themes\.git'
creating d:\workspace\test_app\env\lib\site-packages\flask-0.10.1-py3.5.egg
Extracting flask-0.10.1-py3.5.egg to d:\workspace\test_app\env\lib\site-packages
Adding flask 0.10.1 to easy-install.pth file

Installed d:\workspace\test_app\env\lib\site-packages\flask-0.10.1-py3.5.egg
Processing dependencies for Flask
Searching for itsdangerous>=0.21
Reading https://pypi.python.org/simple/itsdangerous/
Best match: itsdangerous 0.24
Downloading https://pypi.python.org/packages/dc/b4/a60bcdba945c00f6d608d8975131ab3f25b22f2bcfe1dab221165194b2d4/itsdangerous-0.24.tar.gz#md5=a3d55aa79369aef5345c036a8a26307f
Processing itsdangerous-0.24.tar.gz
Writing C:\Users\seiyata\AppData\Local\Temp\easy_install-ovcj7t1a\itsdangerous-0.24\setup.cfg
Running itsdangerous-0.24\setup.py -q bdist_egg --dist-dir C:\Users\seiyata\AppData\Local\Temp\easy_install-ovcj7t1a\itsdangerous-0.24\egg-dist-tmp-wajt8nwj
warning: no previously-included files matching '*' found under directory 'docs\_build'
creating d:\workspace\test_app\env\lib\site-packages\itsdangerous-0.24-py3.5.egg
Extracting itsdangerous-0.24-py3.5.egg to d:\workspace\test_app\env\lib\site-packages
Adding itsdangerous 0.24 to easy-install.pth file

Installed d:\workspace\test_app\env\lib\site-packages\itsdangerous-0.24-py3.5.egg
Searching for Jinja2>=2.4
Reading https://pypi.python.org/simple/Jinja2/
Best match: Jinja2 2.8
Downloading https://pypi.python.org/packages/f2/2f/0b98b06a345a761bec91a079ccae392d282690c2d8272e708f4d10829e22/Jinja2-2.8.tar.gz#md5=edb51693fe22c53cee5403775c71a99e
Processing Jinja2-2.8.tar.gz
Writing C:\Users\seiyata\AppData\Local\Temp\easy_install-6hti5o1r\Jinja2-2.8\setup.cfg
Running Jinja2-2.8\setup.py -q bdist_egg --dist-dir C:\Users\seiyata\AppData\Local\Temp\easy_install-6hti5o1r\Jinja2-2.8\egg-dist-tmp-1435eu0i
warning: no files found matching 'run-tests.py'
warning: no files found matching '*' under directory 'custom_fixers'
warning: no files found matching '*' under directory 'jinja2\testsuite\res'
warning: no previously-included files matching '*' found under directory 'docs\_build'
warning: no previously-included files matching '*.pyc' found under directory 'jinja2'
warning: no previously-included files matching '*.pyc' found under directory 'docs'
warning: no previously-included files matching '*.pyo' found under directory 'jinja2'
warning: no previously-included files matching '*.pyo' found under directory 'docs'
creating d:\workspace\test_app\env\lib\site-packages\jinja2-2.8-py3.5.egg
Extracting jinja2-2.8-py3.5.egg to d:\workspace\test_app\env\lib\site-packages
Adding jinja2 2.8 to easy-install.pth file

Installed d:\workspace\test_app\env\lib\site-packages\jinja2-2.8-py3.5.egg
Searching for Werkzeug>=0.7
Reading https://pypi.python.org/simple/Werkzeug/
Best match: Werkzeug 0.11.9
Downloading https://pypi.python.org/packages/0f/7c/b316cd9779817173e93f5cebc8fb387db33cc8dc526f3db5e61f2c008d5b/Werkzeug-0.11.9.tar.gz#md5=e4dbeb6302ce74babc0d7c21fc3d8291
Processing Werkzeug-0.11.9.tar.gz
Writing C:\Users\seiyata\AppData\Local\Temp\easy_install-c3r4n6bl\Werkzeug-0.11.9\setup.cfg
Running Werkzeug-0.11.9\setup.py -q bdist_egg --dist-dir C:\Users\seiyata\AppData\Local\Temp\easy_install-c3r4n6bl\Werkzeug-0.11.9\egg-dist-tmp-2wv0j0kr
no previously-included directories found matching 'docs\_build'
no previously-included directories found matching 'docs\_themes'
warning: no previously-included files matching '*.py[cdo]' found anywhere in distribution
warning: no previously-included files matching '__pycache__' found anywhere in distribution
warning: no previously-included files matching '*.so' found anywhere in distribution
warning: no previously-included files matching '*.pyd' found anywhere in distribution
creating d:\workspace\test_app\env\lib\site-packages\werkzeug-0.11.9-py3.5.egg
Extracting werkzeug-0.11.9-py3.5.egg to d:\workspace\test_app\env\lib\site-packages
Adding werkzeug 0.11.9 to easy-install.pth file

Installed d:\workspace\test_app\env\lib\site-packages\werkzeug-0.11.9-py3.5.egg
Searching for MarkupSafe
Reading https://pypi.python.org/simple/MarkupSafe/
Best match: MarkupSafe 0.23
Downloading https://pypi.python.org/packages/c0/41/bae1254e0396c0cc8cf1751cb7d9afc90a602353695af5952530482c963f/MarkupSafe-0.23.tar.gz#md5=f5ab3deee4c37cd6a922fb81e730da6e
Processing MarkupSafe-0.23.tar.gz
Writing C:\Users\seiyata\AppData\Local\Temp\easy_install-2h5kjm3n\MarkupSafe-0.23\setup.cfg
Running MarkupSafe-0.23\setup.py -q bdist_egg --dist-dir C:\Users\seiyata\AppData\Local\Temp\easy_install-2h5kjm3n\MarkupSafe-0.23\egg-dist-tmp-3c3jo1r0
==========================================================================
WARNING: The C extension could not be compiled, speedups are not enabled.
Failure information, if any, is above.
Retrying the build without the C extension now.

==========================================================================
WARNING: The C extension could not be compiled, speedups are not enabled.
Plain-Python installation succeeded.
==========================================================================
creating d:\workspace\test_app\env\lib\site-packages\markupsafe-0.23-py3.5.egg
Extracting markupsafe-0.23-py3.5.egg to d:\workspace\test_app\env\lib\site-packages
Adding markupsafe 0.23 to easy-install.pth file

Installed d:\workspace\test_app\env\lib\site-packages\markupsafe-0.23-py3.5.egg
Finished processing dependencies for Flask

Top