sudoはUnixやLinux系のOSにおいて、root権限でコマンドを実行するためのコマンドです。Ubuntuにおいて特定のユーザーがsudoコマンドを利用できるようにするには、そのユーザーをsudoグループに追加するのが簡単です。
$ usermod -aG sudo <ユーザー>
sudoはUnixやLinux系のOSにおいて、root権限でコマンドを実行するためのコマンドです。Ubuntuにおいて特定のユーザーがsudoコマンドを利用できるようにするには、そのユーザーをsudoグループに追加するのが簡単です。
$ usermod -aG sudo <ユーザー>
Webシステムに簡易的なユーザー認証を設定する方法として、Basic認証はアプリケーション本体と切り離して簡単に導入できるためとても便利です。特に開発中のシステムをデモ目的等で一時的に公開したい場合や、少人数で利用する小さなシステムに認証を設定したい場合に有効だと思います。
.htpasswdファイルはユーザー名とパスワードの組み合わせを保存するファイルになります。ファイル名は慣習的に.htpasswdという名前にすることが多いですが、必ずしもそうする必要性はありません。
.htpasswdファイルを作成するには、Linux上ではhtpasswdコマンドを利用するのが便利です。Ubuntuにおいてhtpasswdコマンドが利用できない場合は、apache2-utilsライブラリをインストールするのが良いと思います。
$ sudo apt install apache2-utils
htpasswdコマンドが利用できるようになったら、次のコマンドで.htpasswdファイルを作成します。
$ sudo htpasswd -c /etc/nginx/.htpasswd <username>
cオプションでファイルの出力先を指定します。Nginxの実行ユーザーがアクセスできればどこでも大丈夫ですが、Nginxの設定フォルダかアプリケーションの設置フォルダに配置するのが良いと思います。Webからアクセスできないように注意しましょう。
<username>の部分には、作成したいユーザー名を指定します。
上記のコマンドを入力すると、次のようなプロンプトが表示されますので、設定したいパスワードを入力してエンターを押してください。以上で.htpasswdファイルの完成です。
New password:
Re-type new password:
.htpasswdファイルができたら、Nginxの設定ファイルにそのファイルを指定します。Basic認証を指定したいパスのlocationディレクティブに次の設定を追加します。
server {
...
location / {
auth_basic "Restricted";
auth_basic_user_file /etc/nginx/.htpasswd;
}
}
auth_basicには認証ダイアログに表示させたい文字列を指定します。(ただ、最新のブラウザでは、ここに設定しても表示されないようになってしまったように思われます。)auth_basic_user_fileには先ほど作成した.htpasswdファイルのパスを指定します。
最後にNginxの設定をリロードすれば設定が適用されます。
$ sudo systemctl reload nginx
Basic認証のダイアログで入力されたユーザー名とパスワードは、コロン「:」で連結された後、Base64でエンコードされてサーバーに送られます。デコードすれば簡単にパスワードが見られてしまうため、非SSL(https://ではない)のWebサーバーでは、特別に通信が秘匿される手段が用意されている場合を除いて、利用しないようにしましょう。
Dockerコンテナを起動時にローカルのデータディレクトリや設定ファイルをコンテナ内にマウントしたい場合があると思います。しかし、CドライブをDocker DesktopのVMはを/cにマウントし、WSLは/mnt/cにマウントするため、
$ docker run -v ./conf/nginx.conf:/etc/nginx/nginx.conf
ような形で、ローカル側のファイルを指定すると、次のようなエラーが発生します。
Error response from daemon: failed to create shim task: OCI runtime create failed: runc create failed: unable to start container process: error during container init: error mounting "/mnt/c/workspace/test-app/config/nginx.conf" to rootfs a
t "/etc/nginx/nginx.conf": mount /mnt/c/workspace/test-app/config/nginx.conf:/etc/nginx/nginx.conf (via /proc/self/fd/14), flags: 0x5000: not a directory: unknown: Are you trying to mount a directory onto a file (or vice-versa)? Check if the specified host path exists and is the expected type
これを防ぐにはWSL上でも/cから始まるパスを利用するようにします。
まず/cディレクトリを作成します。
$ sudo mkdir /c
次に/cを/mnt/cにマウントします。
$ sudo mount --bind /mnt/c /c
/c配下のプロジェクトディレクトリに移動してDockerを起動します。
$ cd /c/workspace/test-app
$ docker run -v ./conf/nginx.conf:/etc/nginx/nginx.conf
※/cをマウントしても、/mnt/c配下のプロジェクトディレクトリではエラーのままになりますので、注意してください。
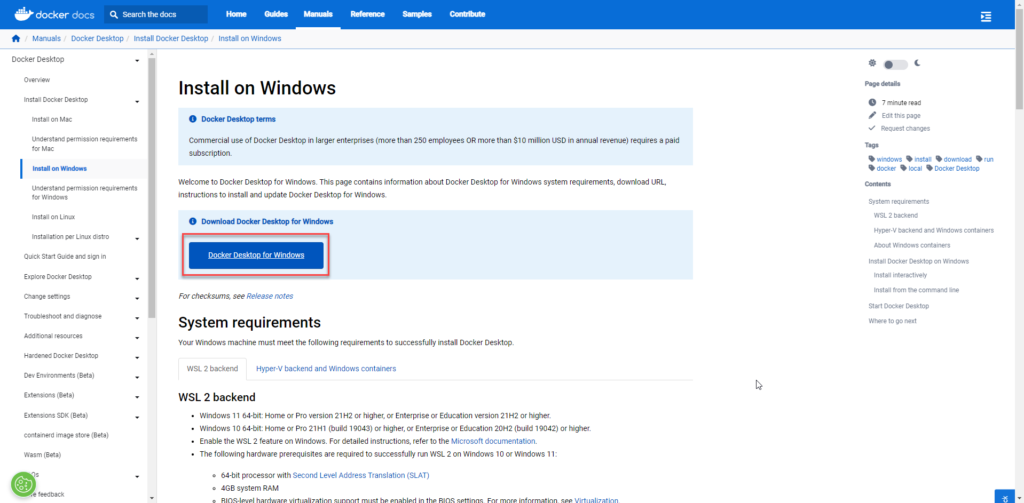
WSL1からDocker Desktopを利用する方法について説明します。WSL2であればUbuntu上にDockerを直接インストールすることが可能ですが、WSL1では難しいため、DockerエンジンとしてDocker Desktopを利用し、WSL1のDockerクライアントから接続するようにします。
こちらのページからインストーラーをダウンロードして実行します。
https://docs.docker.com/desktop/install/windows-install/
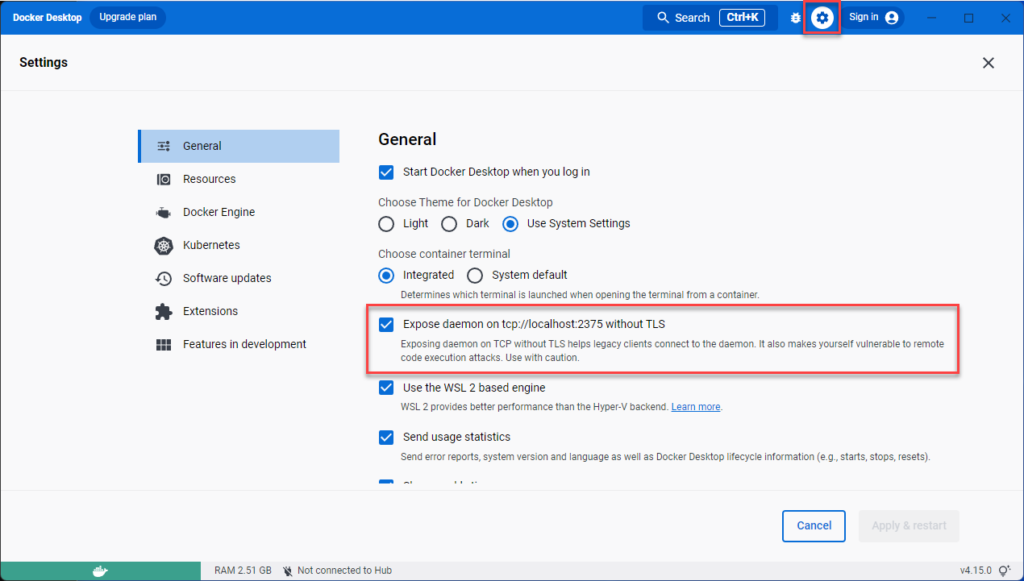
Docker Desktopを起動し、画面右上の歯車アイコンをクリックすると設定画面が開きます。Generalの「Expose daemon on tcp://localhost:2375 without TLS」をチェックし、「Apply & restart」ボタンをクリックします。これでWSL1からTCPを利用してDockerに接続することができるようになります。
こちらに記載の手順に従って、WSLのUbuntu上にDocker CLIをインストールします。ただし、Docker Engine不要なので、apt-get installの箇所はdocker-ce-cliだけを指定します。
$ sudo apt-get install docker-ce-cli
※Docker Composeを利用する場合はプラグインをインストールします。
$ sudo apt-get install docker-compose-plugin
利用ユーザーのホームディレクトリの.bash_profileまたは.bashrcにDOCKER_HOST環境変数を設定します。この設定によりDockerクライアントはDocker Desktopを向くようになります。
$ vi ~/.bash_profile
export DOCKER_HOST=tcp://localhost:2375
ターミナルを再起動するか、sourceコマンドを利用すると、環境変数が反映されます。
$ source ~/.bash_profile
Linuxでディレクトリを作成するにはmkdirコマンドを利用します。
$ mkdir sample_dir
作成したディレクトリの所有者を変更するにはchownコマンドを利用します。
$ chown sample_user:sample_group sample_dir
さらに作成したディレクトリの権限を変更するにはchmodコマンドを利用します。
$ chmod 755 sample_dir
このように通常3回コマンドを実行する必要があるのですが、installコマンドを利用すると、ディレクトリの作成と所有者および権限の指定を同時に行うことができます。
$ install -d -m 0755 -o sample_user -g sample_group sample_dir
地味に便利です。
LaravelでPOSTリクエスト等を送信する場合は、CSRF対策用のトークンをhiddenタグにセットします。通常@csrf
ディレクティブを<form></form>の中に入れることで、hiddenタグが自動生成されます。
これを入れ忘れて、フォーム送信時に419 PAGE EXPIREDというエラーを発生させるのが、よくやりがちなミスですが、今回@csrf
を入れているのにも関わらず、419エラーが発生することがありました。
他で紹介されているキャッシュやセッションファイルの削除等を試しましたが、エラーが解消されず、色々と調べた結果、POSTリクエストに含まれる変数の数(inputタグ等の数)が多すぎたため、PHPの設定により上記トークンを含むリクエストの一部が削除されてしまっていたことが分かりました。
php.iniのmax_input_varsという項目を設定することで解消しました。(初期値は1000)
; How many GET/POST/COOKIE input variables may be accepted
max_input_vars = 100000
リクエストのデータサイズが大きい場合は、次の設定も更新する必要があります。
; Maximum size of POST data that PHP will accept.
; Its value may be 0 to disable the limit. It is ignored if POST data reading
; is disabled through enable_post_data_reading.
; http://php.net/post-max-size
post_max_size = 64M
; Maximum allowed size for uploaded files.
; http://php.net/upload-max-filesize
upload_max_filesize = 64M
Noto Sans CJK JPはGoogleとAdobe(Adobe側の名称は源ノ角ゴシック/Source Han Sans JP)が共同開発したオープンソースのフォントです。視認性が高く、無料で使えるため、多くのWebサイトで利用されています。(当サイトも利用しています。)
https://fonts.google.com/specimen/Noto+Sans+JP
https://www.google.com/get/noto/help/cjk/
Webサイトで利用する場合は、HTMLかCSSにWebフォントとして利用するための設定を行えば表示されますが、サーバー側の処理で作成するPDF等で利用するには、フォントをサーバーにインストールする必要があります。
ここではCentOSにNoto Sans CJK JPをインストールする手順についてご説明します。
$ wget https://noto-website-2.storage.googleapis.com/pkgs/NotoSansCJKjp-hinted.zip
$ unzip NotoSansCJKjp-hinted.zip -d NotoSansCJKjp
$ sudo mv NotoSansCJKjp /usr/share/fonts/NotoSansCJKjp
$ sudo chmod 644 /usr/share/fonts/NotoSansCJKjp/*
$ sudo fc-cache -fv
※sudo: fc-cache: command not found
と表示が出た場合、フォント管理のためのライブラリFontconfigがインストールされていない可能性があります。その場合は、yumを利用してインストールします。
$ sudo yum install fontconfig -y
$ fc-list | grep NotoSansCJKjp
/usr/share/fonts/NotoSansCJKjp/NotoSansCJKjp-DemiLight.otf: Noto Sans CJK JP,Noto Sans CJK JP DemiLight:style=DemiLight,Regular
/usr/share/fonts/NotoSansCJKjp/NotoSansMonoCJKjp-Bold.otf: Noto Sans Mono CJK JP,Noto Sans Mono CJK JP Bold:style=Bold,Regular
/usr/share/fonts/NotoSansCJKjp/NotoSansCJKjp-Black.otf: Noto Sans CJK JP,Noto Sans CJK JP Black:style=Black,Regular
/usr/share/fonts/NotoSansCJKjp/NotoSansCJKjp-Light.otf: Noto Sans CJK JP,Noto Sans CJK JP Light:style=Light,Regular
/usr/share/fonts/NotoSansCJKjp/NotoSansCJKjp-Thin.otf: Noto Sans CJK JP,Noto Sans CJK JP Thin:style=Thin,Regular
/usr/share/fonts/NotoSansCJKjp/NotoSansCJKjp-Bold.otf: Noto Sans CJK JP,Noto Sans CJK JP Bold:style=Bold,Regular
/usr/share/fonts/NotoSansCJKjp/NotoSansCJKjp-Medium.otf: Noto Sans CJK JP,Noto Sans CJK JP Medium:style=Medium,Regular
/usr/share/fonts/NotoSansCJKjp/NotoSansCJKjp-Regular.otf: Noto Sans CJK JP,Noto Sans CJK JP Regular:style=Regular
/usr/share/fonts/NotoSansCJKjp/NotoSansMonoCJKjp-Regular.otf: Noto Sans Mono CJK JP,Noto Sans Mono CJK JP Regular:style=Regular
以上でインストールは完了です。
Let’s Encryptでドメインにワイルドカードを使用するには、次のコマンドを実行します。
※例として*.example.comを設定しています。以下、example.comのところを、お使いのドメインに置き換えていただければと思います。
$ certbot certonly --manual --preferred-challenges dns-01 -d *.example.com -m info@example.com
コマンドを実行すると、次のようなメッセージが出力されます。xxxx…のところには、実際には英数字およびアンダースコア等で構成された文字列が表示されます。
Performing the following challenges:
dns-01 challenge for example.com
- - - - - - - - - - - - - - - - - - - - - - - - - - - - - - - - - - - - - - - -
Please deploy a DNS TXT record under the name
_acme-challenge.example.com with the following value:
xxxxxxxxxxxxxxxxxxxxxxxxxxxxxxxxxxxxxxxxxxx
Before continuing, verify the record is deployed.
- - - - - - - - - - - - - - - - - - - - - - - - - - - - - - - - - - - - - - - -
Press Enter to Continue
xxxx…の文字列を、DNSのTXTレコード(キーは_acme-challenge.example.com)として設定します。設定前に、勢い余ってEnterを押さないことに注意します。
TXTレコードの設定が反映されたら、Enterを押して完了です。
TXTレコードを確認するには次のコマンドが便利です。
$ host -t txt _acme-challenge.example.com
ワイルドカードを使用しない場合、証明書の更新は次のコマンドで行うことができます。
$ certbot renew
ただ、上記手順で証明書を作成した場合、このコマンドでは次のエラーが発生します。
$ certbot renew
Saving debug log to /var/log/letsencrypt/letsencrypt.log
- - - - - - - - - - - - - - - - - - - - - - - - - - - - - - - - - - - - - - - -
Processing /etc/letsencrypt/renewal/example.com.conf
- - - - - - - - - - - - - - - - - - - - - - - - - - - - - - - - - - - - - - - -
Cert is due for renewal, auto-renewing...
Could not choose appropriate plugin: The manual plugin is not working; there may be problems with your existing configuration.
The error was: PluginError('An authentication script must be provided with --manual-auth-hook when using the manual plugin non-interactively.',)
Failed to renew certificate racks.jp with error: The manual plugin is not working; there may be problems with your existing configuration.
The error was: PluginError('An authentication script must be provided with --manual-auth-hook when using the manual plugin non-interactively.',)
- - - - - - - - - - - - - - - - - - - - - - - - - - - - - - - - - - - - - - - -
All renewals failed. The following certificates could not be renewed:
/etc/letsencrypt/live/example.com/fullchain.pem (failure)
- - - - - - - - - - - - - - - - - - - - - - - - - - - - - - - - - - - - - - - -
1 renew failure(s), 0 parse failure(s)
現在のところ、証明書の更新の際も作成と同じコマンドを使用して、DNS設定を再度行う必要があるようです。
$ certbot certonly --manual --preferred-challenges dns-01 -d *.example.com -m info@example.com
Let’s Encryptは無料で利用できるSSL証明書です。ただ、90日間で期限が切れてしまうため、定期的に更新する必要があります。
証明書の更新はコマンドのみで実行できるため簡単ですが、それでも手動で行うのは手間が掛かりますし、更新を忘れてしまいがちですので、Cronを利用して自動実行するのが良いと思います。
$ sudo crontab -e
00 04 01 * * certbot renew && systemctl reload nginx
上記の例では、毎月1日早朝4時に証明書の更新を行っています。また、Webサーバーは更新済みの証明書を再度読み込む必要があるため、Nginxサービスに対してreloadコマンドを実行しています。
CentOSでyumでインストールした場合、自動更新用のサービス(certbot-renew)が用意されているので、そちらを利用した方が良いと思われます。
$ sudo systemctl enable --now certbot-renew.timer
更新後にNginxをリロードする場合は、次のファイルに設定します。
$ sudo vi /etc/sysconfig/certbot
POST_HOOK="--post-hook 'systemctl reload nginx'"
まず、PHP用のaptのPPA(Personal Package Archive)リポジトリを追加します。
$ sudo apt install -y software-properties-common
$ sudo add-apt-repository ppa:ondrej/php
$ sudo apt update
次に、追加したPPAリポジトリを利用して、必要なバージョンのPHPをインストールします。ここではPHP 7.3をインストールしています。
$ sudo apt install -y php7.3
開発しているアプリケーションに応じて、使用するPHPのバージョンを変えたい場合があると思います。その際には、update-alternativesコマンドを利用すると、簡単にバージョンを切り替えることができます。
例えば、php7.2に切り替えたい場合は、次のように行います。まず、aptコマンドでphp7.2をインストールします。
$ sudo apt install -y php7.2
その上で、update-alternativesコマンドを次のように実行します。既にインストールされているバージョンの一覧が表示されますので、インストールしたいバージョンのSelectionの列の数字を入力し、Enterを押します。
$ sudo update-alternatives --config php
There are 2 choices for the alternative php (providing /usr/bin/php).
Selection Path Priority Status
------------------------------------------------------------
0 /usr/bin/php7.3 73 auto mode
1 /usr/bin/php7.2 72 manual mode
* 2 /usr/bin/php7.3 73 manual mode
Press <enter> to keep the current choice[*], or type selection number: 1
update-alternatives: using /usr/bin/php7.2 to provide /usr/bin/php (php) in manual mode
以上で、バージョンの切り替えが完了します。